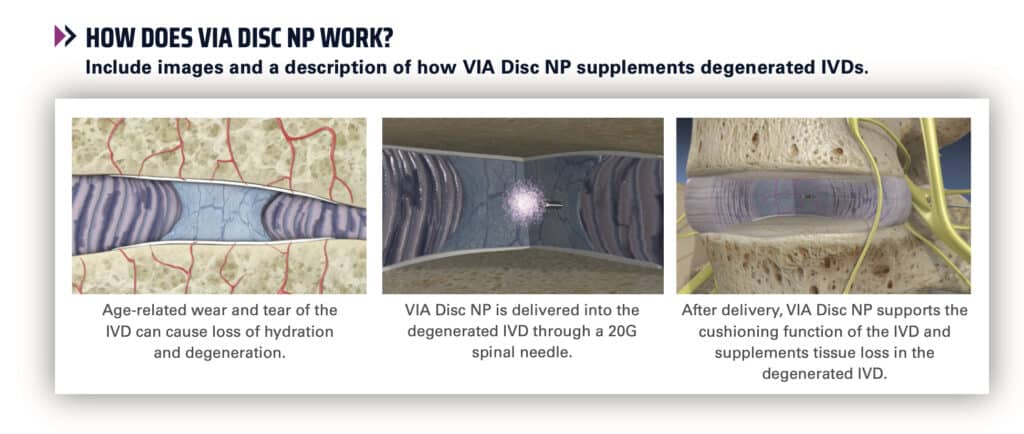
A micro endoscopic posterior cervical discectomy is a surgical procedure used to relieve neck and radiating arm pain caused by a herniated or diseased disc. The surgery removes bone or disc herniation as needed to relieve a compressed root nerve.
Because this procedure is micro endoscopic, you can have it done as an outpatient procedure through same-day surgery. Your Southeastern Spine Institute (SSI) back surgeon only needs to make a small incision because he uses a tubular device called a retractor, through which he or she passes a surgical light, a small camera and surgical instruments.
OVERVIEW
Your back doctor performs this minimally invasive surgical procedure to remove obstructions such as parts of a herniated or diseased disc to relieve neck and radiating arm pain. The obstructions impinge or compress a root nerve exiting your spinal column, and that’s what causes your pain.
The procedure is detailed below. Discuss your risks and outcome expectations with your SSI back surgeon. This has been a successful procedure for thousands of patients.
 1. INSERTING THE GUIDE WIRE
Your doctor inserts a guide wire through a small incision to locate the affected disc in your spine. The surgeon uses a fluoroscope, which displays live X-ray images, to make sure that he or she correctly lines up the route to the damaged disc.
2. INSERTING THE TUBES
The surgeon passes a series of dilation tubes over the guide wire, pushing apart the tissue to create an opening to your vertebrae. Then he or she removes the guide wire.
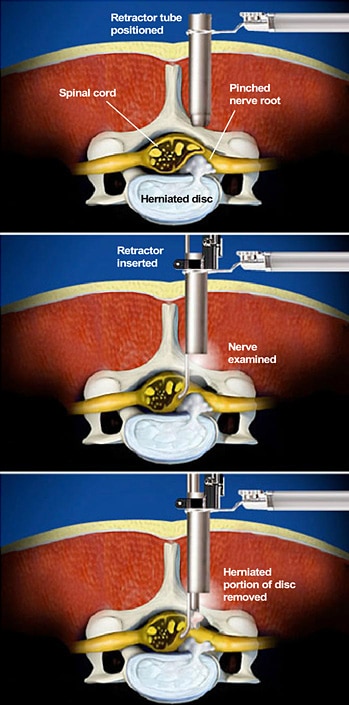
3. POSITIONING THE RETRACTOR
As shown in the top illustration, the tubular retractor slides over the dilating tubes to the bone surface. The retractor provides the opening through which your doctor will perform the surgery. The physician then removes all the dilating tubes.
4. INSERTING THE INSTRUMENTS
A surgical light and small camera (or microscope) allow your doctor to see through the tube. He or she uses special surgical instruments, passed through the tube, to clear away bone and soft tissue to access your spinal canal.
5. EXPOSING THE NERVE
You doctor may use a small drill to clear away enough bone to expose the pinched root nerve and the obstruction (e.g., a herniated disc) below it.
6. INSPECTING THE NERVE
As shown in the middle illustration, your surgeon passes a small instrument through the retractor tube to check the nerve for obstructions and other abnormalities.
7. REMOVING THE DAMAGED DISC OR OBSTRUCTION
Using small surgical instruments passed through the retractor, the surgeon removes the herniated portion of the disc or whatever bone is in the way of the root nerve. He or she clears the area to create enough room for the nerve to move back unimpeded into its normal position. See the bottom illustration.
8. RECOVERING FROM THE PROCEDURE
The surgeon withdraws the tubular retractor, which allows your body tissue to close around the surgery site. Because the incision is small for a Micro Endoscopic Posterior Cervical Discectomy, you need only a small bandage to close the surface wound.
While you can return home after an observation period, you still must rest and heal. As your surgery wound heals, you can return to normal daily activities around the house. Depending on your occupation, you may be allowed to return to work within one or two weeks.