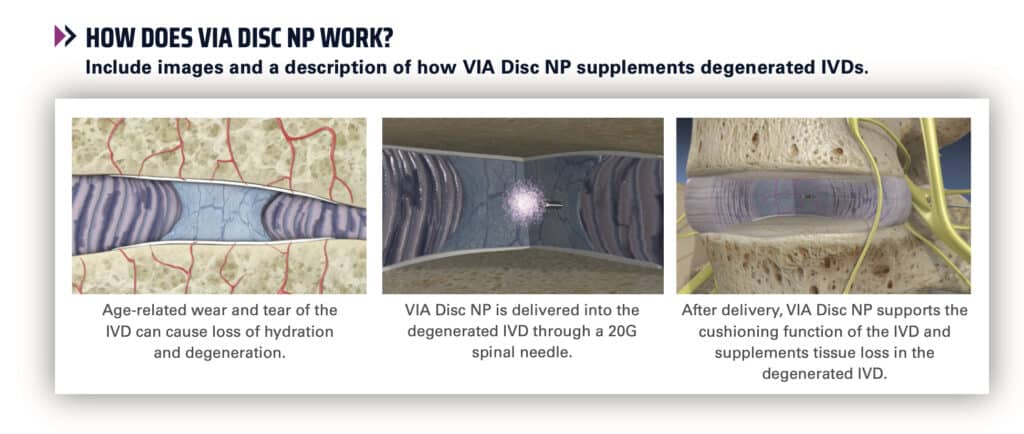
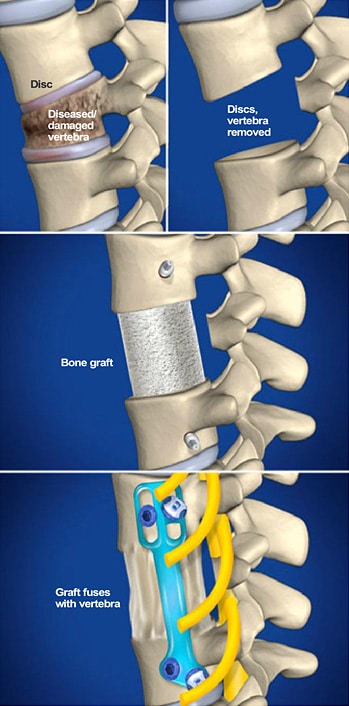
If you’ve suffered a spinal fracture or have a tumor or infection that’s causing compression of your spinal nerves, you may be in serious pain. One treatment, though surgically invasive, is a lumbar corpectomy. During this procedure, your board-certified surgeon removes almost all of the injured vertebra and disc.
The physicians at SSI often don’t recommend this procedure as the first step, preferring to try more conservative care options first. If you’re suffering from severe pain, however, a lumbar corpectomy may be the best solution.
Our expert Charleston back doctors perform this procedure from the anterior or the side of your spine, not from the back. This method provides the surgeon with greater access to the bones and reduces the risks involved. In some cases, the bone graft that replaces the vertebra and disc is fused to the surrounding bones.
OVERVIEW
If you suffer from pain caused when diseased or damaged vertebrae bones block or pinch your spinal cord, a lumbar corpectomy can stop the pain by addressing the cause. This procedure also can correct spinal column deformities. The procedure is described below. Ask your surgeon about your risks and recovery expectations.
 1. PREPARING FOR SURGERY
Usually, the surgeon performs this surgery through your left side. To prepare you for this procedure, you are positioned on your right side.
2. REMOVING THE VERTEBRAL BONES
Your surgeon makes an incision where it’s easiest to access the damaged vertebra and discs. He or she then carefully removes the diseased and damaged parts of the vertebral bone. This relieves the pressure on your nerve roots. See the top illustrations.
3. REMOVING THE DISEASED FRAGMENTS
The spine surgeon removes the discs above and below the affected vertebra, along with any diseased vertebral fragments. He or she cleans the bone surfaces to get the area ready to receive the bone graft.
4. INSERTING THE BOLTS
Your surgeon screws metal bolts into the vertebrae above and below the gap. These bolts help secure the graft to the remaining vertebrae.
5. CORRECTING THE SPINE CURVATURE
The surgeon opens the vertebral space and corrects the curvature of your spinal column. This delicate operation is called a “reduction of deformity” and its goal is to restore you to your full height.
6. INSERTING THE BONE GRAFT
With the vertebral space held open, your surgeon inserts the bone graft. The graft may be an allograft or an autograft bone. Closing the vertebral space secures the bone graft tightly into place, as shown in the middle illustration.
6. ATTACHING THE ZPLATE
Your surgeon then attaches a metal device called a Zplate onto the two bolts from step 4, per the bottom illustration. The Zplate bridges the vertebrae levels above and below the bone graft. Two specialized nuts hold the Zplate in place, and the surgeon adds two additional screws.
7. RECOVERING FROM THE PROCEDURE
The Zplate keeps the area secure while the bone heals. During the healing process, the bone graft knits with the vertebrae levels above and below to create one solid bone segment known as a bone fusion.
You have to limit your physical exertion for the first two to four weeks after surgery. After four to six weeks, you can bend, lift and twist as your pain disappears and your strength returns.